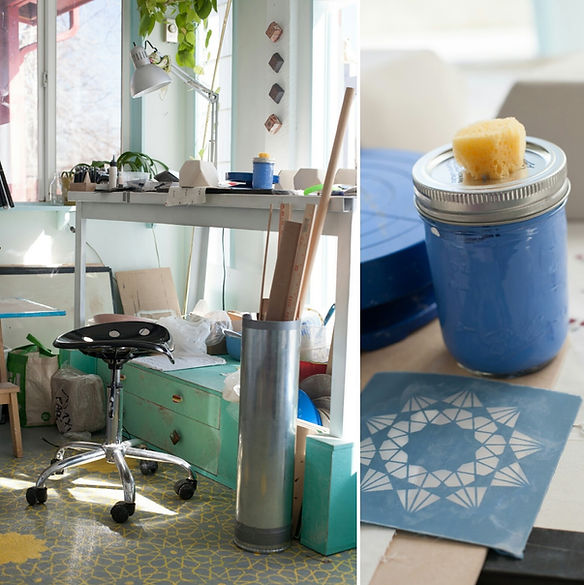
I love peering into the creative and technical processes of artists, engineers, and scientists. There's always something new and exciting to learn. Well, here’s a quick peek into my own building and screen printing process. It’s a geometric journey, if you will, from mud to ceramic polyhedra (fancy nerdtastic term for the shapes that I build).
After rolling clay slabs and smoothing the texture of the clay with a thin metal rib, I cut out the shapes that I need. I’ve created dozens of polygon templates of regular triangles, squares, pentagons, hexagons, heptagons, octagons, nonagons, decagons, and dodecagons. I have dozens of these templates because I need a range of shape sizes that, in order to fit with each other, must have the same length sides. Creating these templates took the most amount of math that I’ve used anywhere in my art. And by math I mean finding an online calculator to tell me what I needed to know…
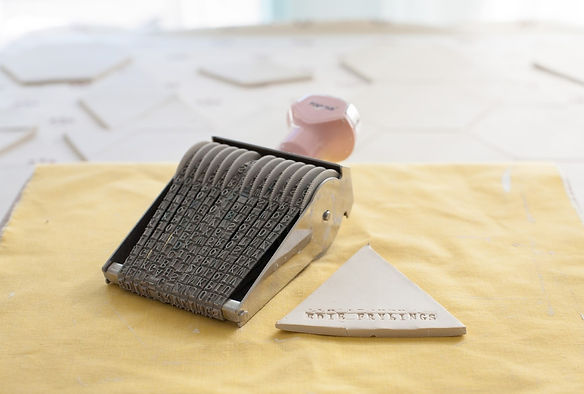
With all of the necessary shapes cut, and before assembly begins, I make sure to stamp my name on the polygon I know will be the bottom. If I fail to do this now it means risking total distortion of the assembled polyhedra when stamping later. It also so happens that this particular stamp has the exact right number of letters for my name: Edie Frylings.

If you have ever taken a pottery class then it’s likely that this term is familiar to you: slip and score. It’s the pottery equivalent of sand before adhering with glue or spray paint. The slip is the glue and scoring the surface of the clay makes for a better bond. The thingamabob I use to score the polygon edges is probably one of my favorite tools. It’s a corn cob poker that I yanked from my grandma’s house before she moved to a retirement home. Jeff can attest to my near constant, “Oooh! Texture thing! Need this thing. I have no idea what this thing could really be used for, but it’s a useful thing! I just know it.” I don’t hoard. I’m an artist. :)
One of the first polyhedra I was shown how to build was a box/cube (nerdtastic term: hexahedron). Cubes are actually much harder to assemble than most of the other polyhedra that I build. In order to be successful you have to make the soft clay slab more rigid using a tar paper building process, and the edges have to be beveled at a 45 degree angle or else you’re left with an excess of clay where the two slabs come together to form an edge. Unsatisfied with with the time and attention to detail that the cube construction required, I began to experiment in order to see if there was a different way to build polyhedra. Specifically, polyhedra with angles other than 45 degrees at the corners … which is pretty much all of them. Enter: corn cob poker. This thingamabob saved the day.
How did the corn cob poker save the day you ask? By “wrecking the edges,” as I like to describe it, the corn cob poker saved me the trouble of having to calculate the angle of the bevel for every edge of every polygon that I use by giving me a wide margin of error in connecting edge to edge. It also serves as the “score” requirement when attaching clay slab to clay slab. This does mean that it requires me to smoothe every seam, but the process works and the results are softer, stronger, rounded edges that I quite like.

After applying slip to the wrecked edges of the polygons I begin to assemble the three dimensional shape. This particular shape is a modified truncated tetrahedron. A tetrahedron is a four sided regular polyhedron - like a pyramid with a triangular base. Truncated means that the points, or vertices, have been chopped off to reveal another face. A regular truncated tetrahedron has eight faces - four hexagons and four triangles - all with the same length edges. Intended to be planters, I wanted theses to be stable, and so I modified the shape to make the bottom triangular face a bit bigger.
If I were to build these shapes any larger than I currently do the assembly portion of the process would be much trickier. I work with the clay while it’s still soft and can’t hold it’s own shape. This requires me to work quickly and to find balance while attaching polygons together. I hope to eventually increase the scale of my work, and that will mean using different building techniques that help to support the soft slabs of clay.
I spend a good chunk of my time smoothing edges and seams together. The wooden tool on the right is like an extension of my own thumb. When my thumb eventually stops working and falls off due to overuse I will design a prosthesis that utilizes this wood tool.
When bringing two edges of clay slabs together a clay coil is often used to reinforce the seam. Unsatisfied with the time and attention to detail that this step requires (theme developing?) I was pleased to discover that wrecking the edges of the polygons also gives me a nice smooge of clay (yes, technical term) to smooth, compress, and serve as a sort of coil reinforcement.
The red rib on the left is an extremely soft and flexible rubber rib that I use to smooth the exterior of the polyhedra and the seams. It’s a really sexy tool.
I use underglaze, a pigment applied directly to the clay under the glaze, to screen print. In order for the underglaze to be usable as a printing medium I have to modify the viscosity by evaporating the water in the underglaze, and by adding a clear acrylic printing medium so that when printing the underglaze doesn’t dry too quickly and clog the screen. The acrylic medium also helps to make the viscosity as close to screen printing inks as possible.
Achieving a perfect registration every time I screen print with underglaze is near impossible to do (but boy do I try!). The surface that I’m printing on is often irregularly shaped and variables like the wetness of the clay and how patiently I’ve prepared a certain underglaze for printing can all affect how crisp and consistent I can be while printing on the polyhedra that I build.
The screens I use for screen printing come from EZScreen. I wouldn't be able to do what I do without their product. It's amazing. EZScreens allow me to screen print directly onto the clay. Because the screens are unbound by a frame I am able to print on irregular and curved surfaces. Typically you will see ceramic artists using a transfer method, where they first print on newspaper and then transfer it to the clay. I much prefer to cut out this step and print directly on the clay. EZScreen makes that possible.
What I love most about this process is bringing together the two dimensional drawings with the three dimensional shapes. There are a million and one combinations and alignments that I can choose to use with the screens and faces of the shapes. Not to mention clay bodies, colors, glazes and firing environments … endless combinations people! This is why ceramics is so addictive. The possibilities are endless and the medium is so engaging.
I hope that you have enjoyed this geometric journey from clay to ceramic polyhedra. Until next time, go get dirty and experiment with something.